Makeup When Dating Over the Age of 45+. Part 2 Eye Makeup & Brows
Let’s focus on eyes and brows in part 2. Please remember that we need to embrace makeup to not only make us feel more beautiful, but there are no rules! Instead of trying to hide flaws, let’s enhance what we’ve got.
Even if you have great genes, age-related changes in our facial appearance are unavoidable. The eye area has the thinnest and most fragile skin on the entire face. We may begin to appear to have darker circles under the eye and the inner corner area. This may be due to heredity, but most often it’s due to the thinning of the skin around the eye. To make matters worse is the fact that the skin itself is falling into the hollow space of the eye socket, and that the darkness that we see is often due to the underlying veins around the eye area.
What can we do? Let’s find the right eye cream – look for anti-aging eye creams, some may even contain retinol products. Please make sure not to use your regular face products on the eyes, we need specific products in this sensitive area.
First, please do not submit to the adage: the more I use the better and faster the product will work. In the eye area, less is definitely more! The size of the amount of cream you use should be the size of a grain of uncooked rice; this will cover both eyes. When we use too much product under the eyes, it can cause milia bumps. What are milia? Milia are tiny cysts that develop due to a harmless buildup of keratin under the skin. Milia are not pimples, and attempting to pop them can cause further inflammation and scarring. You will need to see a dermatologist to remove these cysts.
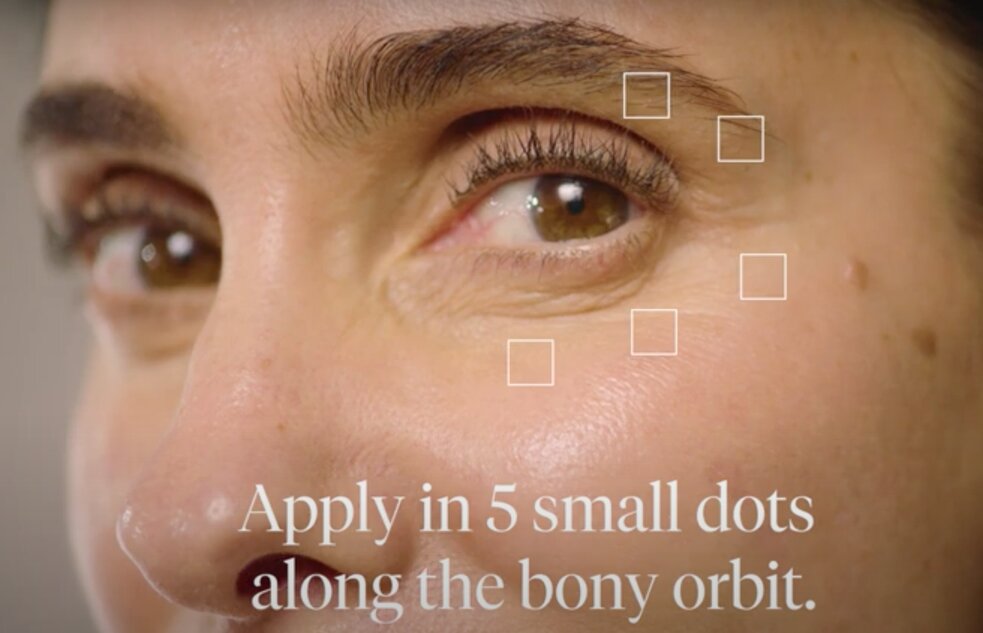
Second, how to apply the cream? Once you have your ½ grain of rice amount of cream, apply it with your ring finger. Did you know our ring fingers have less strength than all of our other fingers? This makes the perfect application for the delicate eye area. Dab 3 dots under the eye and 2 dots in between the eyelid and the brow bone. Basically, follow the orbital bone, or the eye socket, which is a set of bones that surround and protect your eye.
Next, never pull at the skin, instead gently pat the cream from the inner corner to the outer corner until it’s absorbed. You do not need to take the cream up to the upper or lower lash line. The action of blinking and the heat that is created from this motion will disperse the eye cream where it is needed.
Did you know that scientists have shown that the average person blinks 15-20 times per minute. That’s up to 1,200 times per hour and a whopping 28.800 times in a day. Think about this, that is why our eye makeup products tend to feel like they are melting away. The eye area is the hottest area of our face as it’s getting a huge workout daily without us even thinking about it.
Let’s talk now about eyebrows and eyelashes. We all want beautiful, luscious brows and lashes, but unfortunately as we age, the growing process slows and our hair starts to thin and grow sparse. The hairs in the eye area are like the hair on our head, they grow, shed, and regrow. Our brows differ from our lashes in that the process of shedding and regrowth takes place every 4 months, our lashes take 3 months.
I use both a lash serum and a brow serum to help replenish some sparse areas that I have. Please make sure that you are using 2 different products to match the rate of hair growth. I learned the hard way that a lash serum will accelerate the process if used on the brows, and my brows started shedding – I could see this happening.
You may now be thinking, what about my eyebrows? The answer is this: First, never apply a brow pencil or powder that is darker than your hair color – instant aging. Our hair is usually never one shade, it’s usually about 2-5 shades of hairs. Think about your brow product being one of the lighter shades of your hair. You can also use 2 colors in your brows, the lightest color going on the inner parts of your brow (towards the nose) and 1 shade darker towards the tail end.
My best tip is to only use brow pencils or powders to fill in any sparse areas and follow the shape of the way your hairs normally grow. Another tip that gives us the look of an eye lift is to not put product underneath the brow. Instead, take the pencil from the highest point of the arch and fill if needed from above.
You may be asking me, what do I do with any gray hairs in my brows? Try not to pull them out, instead use a colored or tinted brow gel. This will help camouflage the gray color, as a brow gel is like a colored mascara. The brow gel will also hold your brows in place – like a hairspray for the eyebrows.
Keeping the brow color dark and pointed will have anyone looking like Cruella Deville – not the look we want…unless it’s Halloween.
Let’s move on to eye makeup application now. Don’t ever let anyone tell you that over the age of 45 you should never put shimmer on your eyes. The rules are simple here – apply it regularly only on the upper and even on the lower eyelid above/below the iris and into the inner corner of your eye. This helps to draw attention to the color of your eye.
Matte eyeshadows should be used on the brow bone, socket area, and the outer corner of the eye. This will help “push” the area where you may be hooded back, giving you a beautiful eye. And for goodness sake, stop with the black eyeliner on the lower lid. This will not only age you, but it will draw your date’s eye down to the lower lid…not your beautiful baby blue, green or brown eyes.
Please never put shimmer eyeshadows under the brow bone. Other than the nose, the brow bone is usually the feature on our face that is most forward – think of Cro Magnon. By applying shimmer eyeshadows under the brow bone, you are pushing that area even further out and this will age us about 10-15 years.
Let’s finally talk about the elephant in the room…what to do with dark under eye circles. First of all, do not put concealer that is 2-3 shades lighter than your skin under the eyes. Why? This only makes the darkness under the eye look gray, but it will not match your skin. Have you noticed any tiny “spider” like veins? They are most often blue or purple in color.
What should you do? Color correct the dark circles, i.e. veins. If your veins under your eye look blue, a salmon or orange color corrector will work wonders. However, if the veins under your eye are more purple (which mine are), a yellow or olive color corrector works best.
Apply very thin layers of color corrector only on the areas where this color shows through and pat gently into the skin. This often takes care of the darkness immediately and no concealer will need to be applied. The areas you have color corrected will need to be set with a tiny – yes I said a small amount of powder (under eye powder is usually more finely milled and works great in this area).
Now if the hollows from the orbital bone are coming through, you can add a concealer that is 1-2 shades lighter than your foundation. Please make sure you are only applying this color only to the area that looks hollowed out, do not put this everywhere. Light colors push things forward and this will help give the appearance of the hollow being pushed out.
Never put too much concealer around the crow’s feet area of the eyes. The concealer just gets caught in the fine lines and will appear to make you look older than you are. If you want to lift the outer corner of your eye, apply a teeny, tiny amount of the color you used on the hollows just at the outer edge and press into the skin lightly with your ring finger.
I hope this helps you out by feeling more confident, whether you are beginning a new journey of dating after 45, or just some tips to help as we all age.
I offer several product suggestions in my Shop My Shelf page.